Thursday, November 12, 2009

ICY TIP: Expand your WD TV Storage Capacity with The ICY DOCK Enclosure


In the recent years, video files have grown exponentially in their size. When storing huge collections of movies, television shows, and other videos, a dedicated media drive can max out quicker than you would like it to.

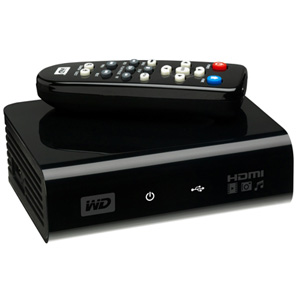
The current solution to this problem is buying an external hard drive, storing your videos, and then moving on to another external drive when free space is gone. Additionally, with most media extenders like the Western Digital TV HD Media Player, the user will also need to utilize a USB hub due to the product only have a single USB input. However, in most cases, this also means adding another power supply, and another interface cable. In some cases, this leads to 3 or 4 different drives, all bound up together in a rats nest of cables. This definitely does not sound like something you want sitting on your media center in your living room!
The solution, of course, is much simpler, and more efficient. Using our MB561US-4S Quad Bay SATA HDD Enclosure, you can have up to 8TB of storage (2TB x 4 HDD), allowing you to store almost endless amounts of video, photos, and music. This device uses a built in USB port multiplier so that you only need a single USB port to access all 4 drives, and even has a built in power supply. Using our multi-bay hard drive enclosure you have already cut down your mess of wires and external drives, and cut down on your power bill!

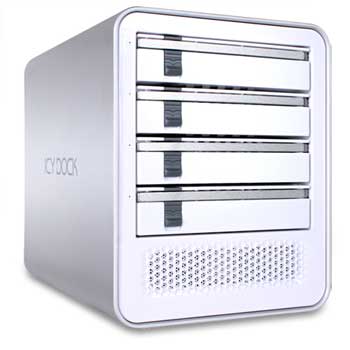
Simply gather your hard drives, empty or containing existing files, and install them into their respective EZ Slide trays. Now place them into the MB561, connect the single USB cable to your WD TV HD Media Player and the single power cord to an outlet. Finally, flip the power switch, and you are ready to go.

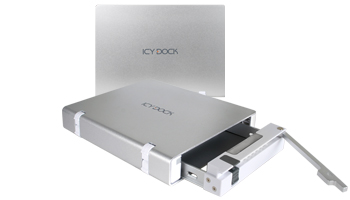
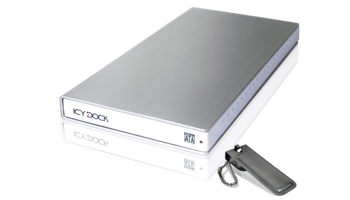
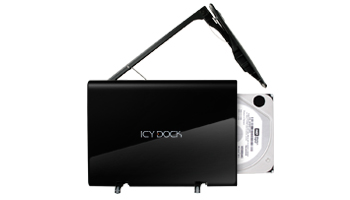
Another issue when using multiple drives is figuring out a convenient way to transfer all of your files to these storage devices. Since Icy Dock products are engineered for multi-system integration, you can take a single drive out of the MB561, use our MB559 Series Single Bay Enclosure that is permanently stationed near your desktop or mobile PC, and use it to transfer all of your media for use with your MB561 that is connected to your WD TV HD Media Player.
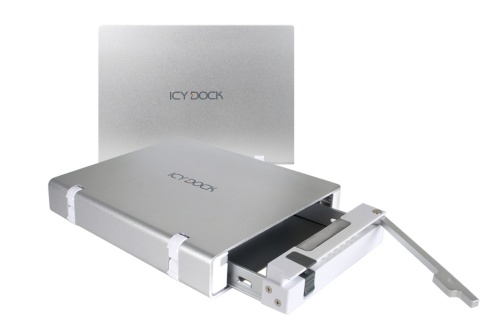
The benefits to this include not having to lug around the large multi-bay enclosure that can begin to weigh over 10 lbs when fully loaded with hard drives. Another benefit is that both products use our EZ Slide trays, so there is no fumbling with screws or different sets of trays for each enclosure.

There are many different methods for utilizing your media collections, however, here at Icy Dock we always prefer to use the simplest means possible. Using what we call the "Single" method, you can use a single multi-bay enclosure, a single USB cable, and a single power cord to do the work of four different external hard drives, cut out four different power adapters, and four different USB cables. If you're looking for a solution to your media center, look no further than these two Icy Dock products in combination with the Western Digital TV HD Media Player.


Cheers,

Team Icy Dock

Links and Other Information
http://www.icydock.com/product/mb559uea-1s.html - MB559UEA (FIREWIRE 400 & USB)
http://www.icydock.com/product/mb559ueb-1s.html - MB559UEB (FIREWIRE 800 & USB)

**Please note that due to recent firmware updates for the WD TV HD, USB hubs and multi-drive enclosures will not work. Version 1.02.08 and later firmware are reported to no longer work with USB hubs. Support for USB hubs did work in versions 1.02.07 and earlier releases. Please refer to this link for more information: WD TV HD Firmware. Before making changes to your device, please always do sufficient research into the topic and procedure.

****Unofficial firmware is also available that allows for USB hub use and additional features such as network support and USB Blu Ray and DVD drives. This may or may not void the WD HD TV warranty.

Labels: , , , , , , , , , , , , ,

Thursday, April 16, 2009

UTILIZE AN EXTERNAL HDD WITH YOUR XBOX 360!


Following up to our previous installment, we will now walk you through how to set up your Icy Dock with the Microsoft XBOX 360.

Previously, the XBOX 360 did not allow users to use an external HDD with media to be played through the system. However, with recent updates for the XBOX 360, users now have many different options for playing media. And with the expensive, yet restrictive hard drives developed by Microsoft for specific use on the XBOX 360, users have been on a constant search for the best solution.

Using an Icy Dock to expand your media center experience via the XBOX 360 allows you to have almost unlimited storage capacities for movies, photos, and music. Simply drag and drop your media into an Icy Dock, and plug it into the XBOX 360 with a USB interface. What this installation guide will show you is how to correctly format the drive for use with the console.

Items you will need
*XBOX 360 (internet connection required for possible media updates)
*Icy Dock Enclosure using a USB interface
*Hard Drive or Solid State Drive for use in the Icy Dock
*PC or Mac
*Movies, Picture, and Music for playback on XBOX 360

Step 1: Format The Drive
*The drive needs to be formatted in FAT32 (MS-DOS File System) for it to be recognized by the XBOX 360.
*Windows Users – Windows can only format drives in FAT32 up to 32GB. To format it to its full capacity, you will need to use a program called Swissknife (http://www.compuapps.com/download/Swissknife/swissknife.htm) or use the command line method from the PS3 guide.
*Mac Users – Open up Disk Utility, and format the disk using MS-DOS.
*Formatting the drive will cause all data on the drive to be lost. Back up anything important before proceeding with the Formatting.

Step 2: Put Media On The Drive
*Since the XBOX 360 is essentially a computer, it will recognize the folder format of your drive. The easiest way to organize your media is Video, Music, and Photos.
*There is no need to re-organize folders within the main folders. For example, a folder holding all your TV shows can be left alone. The music folder organizing all albums or artists can be left alone. The picture photo organizing all photo albums or collections of photos can be left alone.
*Supported video formats
-MP4, AVI (some do not work), WMV, MOV
-The XBOX will display a file with a line through it if it is not playable.

Step 3: Connect The Drive To Your XBOX 360
*Connect the USB cable to the front or rear USB port. If you are using a using a 2.5” drive in the Icy Dock, the power from the USB will be enough to power the drive. All 3.5” applications will require the power supply.
*Go to the Video, Picture, or Music library, and search for your Icy Dock, listed as a portable device.
*Select your drive, browse, and enjoy!

SOFTWARE
*Free and effective open source programs for converting video
-Windows: Media Encoder (http://mediacoder.sourceforge.net/download.htm)
-Mac: FFMPEGX (http://homepage.mac.com/major4/download.html)

SUGGESTED ICY DOCK PRODUCTS


*MB881US-1S
-Fits all 2.5/3.5’’ SATA HDD and SSD
-eSATA and USB interface
-2.5” drive powered by USB when plugged into XBOX 360


*MB559 Series
-Fits all standard 3.5” drives, and 2.5” drives using the MB882SP-1S converter
-eSATA/USB, USB/FIREWIRE400, USB/FIREWIRE800 available
-Available in black, white, and mirror black
-Utilizes are tray system. Spare trays also available.


*MB664 Series
-Fits all standard 3.5” drives, and 2.5” drives using the MB882SP-1S converter
-eSATA/USB, USB/FIREWIRE400, USB/FIREWIRE800 available
-Available in black, white, and mirror black
-Screwless design


*MB663UB Series
-Fits all standard 2.5” SATA HDD and SSD
-Built in USB male plug
-Powered XBOX 360 via USB
-Available in silver and black

Labels: , , , , , , , , , , , ,

Tuesday, April 07, 2009

Utilize an External HDD with your PS3!


How To Set Up Your MB559 Series OR MB664 Series ICY DOCK With PS3

MB664 (Shown in Mirror Black)

MB559 Series (Shown in Mirror Black)

Playstation 3 represents a new level of cutting edge video game technology. Not only does it allow you to play mind numbingly realistic games, but it has built in capabilities to play all your media. The problem however, is that the out of box unit places capacity restrictions on the user in terms of its hard drive. To solve this problem, you can replace the internal 2.5" SATA drive with a larger drive, or save yourself some time and simply plug in an external hard drive via USB. Using an external storage device, you can save video, audio, photos, and game data.

With an ICY DOCK hooked up to your PS3, you have almost unlimited storage capabilities. Utilize separate drives/trays for various media types, or unplug from your PS3 and use the drive to back up your newest vacation photos. If you run out of room, just pop in a fresh drive and you are back to square one!

And, with the newest color of our popular single bay series, your dock will be functional and stylish, all with the quality and simplicy that ICY DOCK gaurantees with all of our products!

Heres how you do it:

*Connect the ICY DOCK to your computer using a USB cord and switch unit power to ON.

*Check what the "File System" type is by going to Start, Control Panel, Administrative Tools, Computer Management, Disk Manager. Select the ICY DOCK and read the "File System" type. The file system type must be "FAT32" in order for the Playstation to recognize it.


*If the file system type is "NTFS", right click and select "Delete Partition" or "Delete Volume" for Vista.


*Then recreate the partition but do NOT format it. Make sure you assign a drive letter (for this Tutorial, we'll use H:)


*If you are running Windows, format the drive by going to the command prompt (Vista, right click on command prompt in start menu and click "run as administrator")and type in "format h: /FS:FAT32" (without the quotes). You may need to substitute your drive letter. (note this might not work on XP for a large hard drive - you may have to use a third-party formatting utility like SwissKnife; however, it does work under Vista - just be sure to use the format command from the DOS prompt, not from Windows Explorer)


*If you are using Mac OS X, open /Applications/Utilities/Disk Utility.app, pick the drive, and click on the 'Erase' tab. Pick 'MS-DOS (FAT)' for the file system type, and click on the 'Erase' button. This will reformat the drive in FAT-32.


*If you have Mac OS X Leopard: Open /Application/Utilities/DiskUtility.app, pick the drive and click on the 'Partition' tab. Pick '1 Partition,' for the Volume Scheme, and 'MS-DOS (FAT),' for the Format. Click the 'Options...' button (near the bottom) and select 'Master Boot Record.' Press 'Okay' and then 'Apply.'


*Open "My Computer" and double-click on your ICY DOCK.


*Create a folder system identical to that on the Playstation 3 by creating folders labeled "Picture" (not Photo), "Music", "Video" and "Game".


*Load all media into their proper folders. Your game folder should still be empty.


*Safely disconnect the ICY DOCK.


*Connect the ICY DOCK to your Playstation 3.


EXTRA TIPS AND TRICKS


*Game data can be saved the external HDD as well.


*Supported File Types for PS3

-Video: MPEG 4, MPEG 2, AVI, WMV, DIVX
-Audio: MP3, MP4, ATRAC, WMA, MP4

*Open Source Video Converters

-For Windows, MEDIA CODER
-For Mac, FFMPEGX

*Swissknife Download Page


*Use the ICY DOCK to create a hassle free transfer from you old internal HDD to your new internal HDD via our MB882SP-1S-1B 2.5” to 3.5” SATA HDD Converter Box.


---------------------------------------------------------------------------------------------------------------------------------------------

installation source: http://www.wikihow.com/Add-an-External-Hard-Drive-to-a-PlayStation-3

Labels: , , , , , , , ,